2D Motion Tracking: Filming and Editing – 12/03/21

For my 2D Motion Tracking project, I have decided to pay homage to Street Fighter and re-create a Hadouken. So I took the camera to the green screen and used my actor to throw a paper ball at a wall. I decided to use a paper ball because it has an apt weight about it, it doesn’t fly through the air but it also doesn’t float either. If I had an extra resource such as a stick available, I would have put a paper ball or ping pong ball on the end of the stick and moved it along.

First things first though, before I could get any filming underway, I had to do a risk assessment of the area.

Risk Assessment – VFXF1

With that out of the way, we let the filming commence, I took a few photos of Jake in front of the greenscreen with the camera in shot, I took these photos using my phone.

Importing Footage – VFXF2

Once filming was complete, I had to transfer the video from my SD Card to my computer, so I removed the SD card from the camera and inserted it into the SD slot on my laptop. I then navigated to the directory and copied the file from the source directory to my desktop, just to make it easier to find.

Once that was available on my computer, I uploaded the footage to YouTube.

It was then time for my favourite part, the easiest part of all, importing my footage into premiere pro. I opened up Premiere Pro and imported my footage. I done this by dragging and dropping from my Explorer window and into Premiere Pro.

Next, I cut the footage into 3 parts and chose the best take and then I cut that into 3 parts. Rather then motion tracking the paper ball, I am now going to motion track Jakes Head to a Player 1 logo. The part in the middle is going to be slowed down to emphasise a Hadouken movement. Finally, it was time to take my film into After Effects.

Once I was in after effects, I precomposed all of my clips into one composition, and then I keyed out the background before scaling the precomp to a reasonable size. I then took to photoshop to create some graphics to place on my scene.

Tracking The Footage – VFXF3

With the graphics designed, I imported this media to my after effects project and placed them accordingly, except for the 1P Arrow graphic. This is the graphic that is going to be tracked above jakes head. It was time to start tracking that motion.

I created a null object and set this as my target on my motion footage, then I placed and stretched the bounding box over the face of Jake and then pressed the analyze forward button, roughly about an hour later, a motion path was created and I used the whip to parent the 1p icon to the motion.

After scaling and adjusting the anchor point of my 1p icon, I ended up with this. I have added in Temple Hideout backgorund from Street Fighter and an animated GIF of Ryu’s stance and being hit.

So far so good, next it was time to make a HADOUKEN come out of Jake’s hands and make it so Ryu reacts accordingly after the Hadouken hits. I think I am going to turn my attention to either After Effects particle system or Particle Illusion to achieve this.

I took to particle illusion which is a FX software and made a blue orb, I then exported this as a transparent video and imported it into the After Effects project, I then scaled and positioned it to the motion from the video of Jake. The paper ball did not track successfully so I masked this out.

And that was my work in After Effects complete. I went back into Premiere Pro and added some sound effects I downloaded from Street Fighter. (LINK). It was time to create some background music, to do this I used Acoustica Mixcraft. I then added the music to my Premiere Pro Project. Mixcraft had a nice loop named X Agent Loop so I looped this a couple of times and used this.

Exporting Video – VFXF4

Finally I exported the movie by going to File > Export and chose these settings

The final video is below

I also made a version where the whole video is posterized aswell. Posterized essentially makes it look flat, this helps Jake blend in a little better.

Overall, this project was really fun to do and to be able to mimic one of my favorite fighting games was fun aswell. The only challenging part about this for me was the timing with everything from sound effects to Ryu getting hit with the HADOUKEN. The motion tracking worked first time, however it did take a while due to the spec of my laptop.

It would be fun to re do this project with a different idea as the possibilities with 2D motion tracking can be endless. It is also worth noting that originally, there was a paper ball that was thrown to track the HADOUKEN to, but with the frame rate and trajectory of the ball, it wasn’t suitable to motion track, it was definitely the right move to track Jake’s motion for a 1P icon.

2D Motion Tracking: Examples and Ideas – 02/03/21

2D Motion Tracking is a process in VFX that allows something in a shot to be tracked, this is useful for allowing a focus on something or for applying a visual effect such as a fireball or something alike.

Examples of 2D Motion Tracking

Iron Man

In Iron Man, they use a 2D Tracking technique to track Tony Starks HUD when he is in the suit. This is done by tracking Tony’s eye whilst he is in the suit. They would have used a green screen to film Robert Downey Jr’s head and then tracked his eye in software such as After Effects. Interestingly enough, the elements they use in these clips may have been flat and look curved due to a lens distortion effect or they made the elements curved and placed them accordingly.

Panic Room

The entire opening title sequence in Panic Room uses motion tracking and to great effect. There is something eerie with the music used and how the credits are presented that just sits well with the film. I think to achieve this, they would have had a panned shot of the buildings // city and then stabilized the footage, after stabilizing the footage, I think they would have just tracked the titles to a centre point.

Beats Advert

Who doesn’t love listening to some beats by Dre through some Beats by Dre? The bass is truly felt in these ads as they use 2D motion tracking to give this shaken effect to replicate the bass hitting you in the face. The subliminal message however behind the advert is that the earphones will stay put in your ears, no matter the exercise, the motion tracking reinforces this and it makes the advert look almost parallax.

2D Motion Tracking Ideas

There are so many possibilities to be created with this project, here are a couple of ideas I have thought of so far..

Idea 1 – Obvious Fireball is Obvious

Everyone once upon a time has wished for some kind of super power, be invisible, fly, teleport… shoot fireballs from your palm. This is an all too common concept for this project, but a fun one to say the least.

Idea 2 – A Real World Video Game

When it comes to video games, anything is possible but what about using video game elements in films. This idea here is simple, we could track quest markers, health bars or other elements in this scene.

Idea 3 – Take Flight

This idea is a bit more suspect than the previous two, with this idea we would film using a green screen an iron man like hover pose and then track it to some shaky footage that has been stabilized instead, I have a rough idea as to how this may work, but that’s not to say that its going to look right.

Idea 4 – The Greenscreen Picasso

This is an interesting idea I’ve had, basically the way this would work is by filming on a greenscreen, waving hands in the air and then masking in the background to the motion of my hand, this could be difficult because I’m unsure as to whether you can track parts of a mask, also with the curvature and scales of the movement.

Alternate method: Rather than rubbing over the greenscreen, rub over the camera lens for a smaller scale. This COULD work.

Idea 5 – The Greenscreen Picasso 2

This one is slightly different, this would involve me being on a greenscreen, and pointing towards the effects button and grabbing chromakey, then it would involve me getting the colour picker and keying out the greenscreen. Finally, dragging a background in to the scene. This would involve screen recordings and a lot of trial and error so as good as this idea is, I don’t think it’ll take off.

Idea 6 – The Hologram Watch

This idea is simple but effective, I would track a hologram to my smart watch, the only issue is that The graphic for the hologram would need to rotate in a 3D space, so you’d be tracking 3D but in a 2D way.

Matte Painting Project – 19/01/21

What is Matte Painting?

A matte painting is a painted representation of a landscape, set, or distant location that allows filmmakers to create the illusion of an environment that is not present at the filming location. By using this technique, it allows us to create not just landscapes but also worlds that may not be possible to get to because they don’t exist or budgets are tight.

Examples of Matte Painting in Film

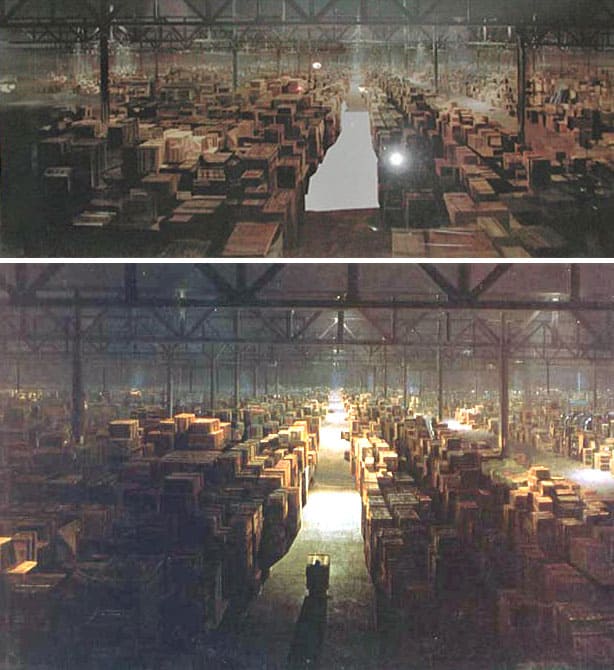
Raiders of the lost Ark
Raiders of the Lost Ark
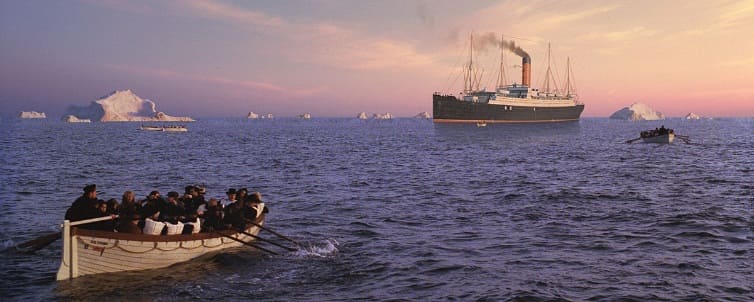
matte painting - titanic
Titanic

My Matte Painting

Risk Assessment – VFXF1

As this is just a short clip in quite an isolated space, the risk for this was very minimal.

Data Transfer – VFXF2

As the footage was recorded on my mobile device, I transferred the footage using a USB cable from my mobile phone to my laptop. As I use an Android device, I have to allow the phone to be accessed by my laptop.

Once that was done, I had to navigate to the location of my footage on my laptop and copy the footage over. I copied this to a project folder on my desktop.

Editing the Footage – VFXF3 x VFXF4

For my own matte painting project, I have gone with the idea that my film is filmed from a first person perspective, in this scene, my character has just came back from a daze and a volcano has erupted in the distance.

Upon capturing my own footage, I decided to start editing a screenshot within photoshop. Firstly I went to Unsplash for an image to manipulate into my project.

I took this image into photoshop and then edited it to fit into a background of my scene. Later on in the foreground, I will add some flakes of ash falling from the sky slowly.

Ideally, that is how I would like my scene to look, so now I need to look at Matte Tracking to keep it in place. Matte Tracking allows me to keep the motion of my camera but it also keeps my matte painting in place whilst the camera is moving.

However, I’ll need to begin my project, so I’ve placed my footage into Premiere Pro and then linked it to an after effects composition. In after effects, I will begin to mask around the area I need to so I can replace the sky with the background, from there I will then need to track the mask and track the background with the footage so that everything is in place.

I masked out the sky using photoshop and made a masking layer for use in After Effects. I overlayed this mask on top of my footage and adjusted the keyframes to make it stay in place or as close to where it is meant to be. Following on from this, I set my footage to Luma under the TrkMat settings. This masked out where the black is on my mask, finally, I made this into a pre-comp.

In my main composition I started to work on some colour correction to make the background fit the scene, to do this I used a 4 colour gradient and the brightness and contrast controls. I also used a keying tool to key out the parts my mask doesn’t cover. Whilst this isn’t perfect and is still noticable in some parts, its way better than what it was.

Finally to assist with the tracking of the mask, I have used a 3D camera tracker. This is supposed to keep my matte painting in place by choosing a 3D point on my scene. The 3D Camera Tracker analyzed my footage and I selected a point for it to track to, this has slightly improved the product but once again, it is not perfect.

Finally I was ready to add some life to my matte painting project by adding sound and a few finishing touches. I went back into Premiere Pro to do this.

In Premiere Pro I added a white rectangle that fades out over the top of the video, and also added a camera blur to give the impression that an explosion has went off and there is some disorientation. For my ashes I used a piece of software called Particle Illusion, which is free to use. Using the Snow Preset, I was able to create some form of ash flakes falling from the sky. I put this on top of my layer and finally added a fade to black.

This is one of the results. There seems to be some weird motions going on in this one, So I’m going to keep cracking at it until its better, but I’ll leave this here so you get the idea of what I am going for.

Attempt Numero Dos

Starting again, I took my footage into Premiere Pro and stabilised it and then exported the footage as new. I then put the newly stabilized footage back into Premiere Pro before making it into an After Effects composition. With this attempt, it is an alien invasion of some sorts.

I then rendered this frame to place into Photoshop to apply some matte painting elements over the top of my composition.

This was done by removing the sky in my original image and replacing it with the background in the overlay image, I then replaced the for sale sign with a radiation poster and I boarded up some windows using the skew tool, for some finer refinements, I also used the clone tool to remove some posts.

Once that was done, I put my overlay image into my composition and started to do some colour correction, to do this I used After Effects tint effect to blend the colours.

Then I started to make the overlay track with the footage, as this is stabalized footage, it was alot easier to track to the footage, I had to do it manually using Keyframes to move the position of the overlay.

I then went to YouTube and found this video of Green Screen UFO’s to place into my composition, using Keylight, I was able to get rid of the green screen. I also used tint effect to match the colours to my scene.

I duplicated the overlay layer to mask out the ufo’s to the right, something didn’t seem right about these so I removed them.

Finally for some motion, I added some clouds into my composition and tinted them the same colour as my scene.

Once this was done, I saved my composition and headed back to Premiere Pro. In Premiere Pro I created my white graphic that fades out at the start of my composition and then keyframed some blur for a disorientated effect on my main footage. I also added a title sequence at the end of my footage.

Whilst I have made two completely different scenes here, I think its fairly easy to say that my second attempt with the alien invasion is way better than my first attempt. I was able to implement some techniques that had been practised in the first attempt. I feel with the first attempt I tried to over complicate it and it didn’t work out exactly how I thought it would. With my second attempt, my matte painting, from a cinematic point of view almost looks believable. So overall, I am happy with the outcome.

With different footage and in a team, I think I could produce an even better matte painting. I had a rough idea for what I wanted and since I was working alone without acting work or a tripod, a first person perspective seemed to be the answer here, I also think that it makes it a unique take compared to what other people may have done. Fair enough you don’t have moving elements in the footage, but you have the movement from the character instead.

In easier times, the project would have been very different as I would have been able to go to another location and capture some better or more exciting footage. In the current situation of COVID, it wasn’t easy for me to go out and film some footage so I only had access to what was available. I feel the footage I captured actually turned out pretty well because it allowed me to fill an entire area and also add some foreground elements to great effect.

Matte Painting Research – 08/01/21

Matte Painting is a technique that uses practically or digitally created sets, landscapes or locations to help create the illusion of a real environment.

Matte Painting has been a technique used in film for almost a century, dating back to at least 1905, a man named Norman Dawn, who was a photographer, would take his photos and paintings and then place them onto large sheets of glass. He would then use black tape to cover the camera lens where the painting would be placed. He’d then film the live action scene and the result of all that was a live scene with the painting as a background. Creating the illusion that the film was set in a location, depicted by the painting.

The technique would go on to be used for years to come, in films such as Planet of the Apes and Star Wars Return of the Jedi. It was only 80 years later when the technique saw a technological advancement with computers and their software, artists were able to digitally paint scenes to be used as backgrounds.

The first one was in 1985 when an artist named Chris Evans (not the actor or radio presenter) became the first person to do a digital matte painting to be used in a film, and that film was called Young Sherlock Holmes. They way he accomplished this was by scanning an image onto a digital painting which created an ultra realistic environment. This in turn, paved the way for Matte Painting that we see in todays films. The film Young Sherlock Holmes is recognised as one of the most ground-breaking films for VFX as it featured the first fully CG character, the stained glass knight.

Obviously since then, there have been bigger changes to technology and how things work, computers are now able to compose layers of film without having to retape over the tape, we can use things like green screen to create these environments and generate light sources. Shots don’t have to be static now thanks to developments with motion tracking and so forth. Not just that but creating an artificial environment has never been easier. With the Internet the way it is now, its very easy to find stock images to use as backgrounds and in some cases foregrounds.

Take the Green Screen project we did as an example, the entire background and floor within that scene is composed of several different images I found on the internet, just by using software like Photoshop, I created an environment to place a character in to, some might even say with that, I’ve effectively killed two birds with one stone. With the addition of the VFX offered by Adobe After Effects, I was able to bring the scene to life by adding layers of fog and motion to the scene outside of the original footage.

Matte Painting is a hidden gem in film, TV and video games. It is such a common technique that is used in pretty much everything that without it, the media we see today probably wouldn’t be the same, so maybe Matte Painters are the real heroes here?. Personally I find it fun to be able to construct and build my own digital environment as the possibilities are quite literally endless.

Camera Trick: Filming and Editing – 01/12/20

Today we started to film our footage for our infinite staircase camera trick. We went to our location we scouted and shot one continuous shot of Jake walking up and down the stairs, looking a bit lost to say the least.

I then took the footage and dragged it into a new premiere pro file and then put it into my sequence. Then right-clicking the footage in the sequence, chose replace with after effects composition.

Firstly, I looked for a blank set frame in our continuous shot, this was to be used as a background. In premiere pro, once I had found a suitable frame, I clicked the export frame button, I saved the frame as a PNG.

I then imported this into my after effects projects and put it as the bottom layer. Then finding the loop, I trimmed my composition to fit the effect of what we were trying to.

Then using the mask tool, I masked around the top layer which shows Jake coming down the stairs, leaving only the banister grate visible to show Jake passing over. I then animated it so the top layer was completely visible.

And that is the editing complete, such a short and simple edit, of course, I could make this loop for ages but I made it loop a couple of times to get the effect across. I’ve used a Premiere Pro preset to create a title sequence at the beginning of the clip.

To do this, I went into the graphics tab on Premiere Pro and selected a preset I liked, I then dragged and dropped it into my timeline. By double clicking the text, I was able to input my own text. Finally, I went to effects tab and added a dissolve to the title.

Finally I exported my video with the following settings and uploaded the final video to YouTube.

I am pleased with the outcome but it was just simply too simple, I would have preferred to do something more complex but location and restrictions of tools were a problem. By this I mean being able to add portals and things alike. Whilst this is a basic camera trick, it still has the essence of one shot. The only thing hat bugs me with this is the way the aperture of the camera hasn’t absorbed the light well, you can see it kind of flicker a couple of times, but that’s to do with the hardware and settings the camera was on.

Camera Trick Planning – 17/11/20

After toying around with ideas and optical illusions to make something work, from printed black holes for someone to trip over or a simple disappearing act, I have thought of another idea that will capture the essence of the camera trick.

The idea I have for my camera trick is to make somewhat of an infinite staircase. Someone will go up or down the stairs, only to appear to be coming down the other side. This is similar to the Escher staircase illusion.

I will be working with Jake for this project and he is handling the risk assessement. I went around the college and looked for a staircase to make famous. There isn’t much space to fit a camera and tripod, but using a wide angle lens from my phone, I was able to capture this shot.

So whats interesting about these stairs is how we can bring the trick to life, as an example, the banister on the stairs features holes that allow you to see whats coming before you’ve even seen it. This will definitely assist us in making it seem true to life.

So when it comes to masking these clips, it is important we don’t miss small details such as these. In terms of filming, we can use one continuous shot of going up both flights of stairs or we could record 2 shots, it really is 6 and 2 3’s. Best of all, it shouldn’t be too complicated.

Risk Assessment

Jake has completed the risk assessment accordingly so it looks like we are ready to start filming, as always the base footage will be uploaded to YouTube followed by the finished product. Job should be a good one!

What is Composition? – 24/11/20

Composition in film is the art of how objects are arranged within a scene. There are many techniques and ways on how to do this, but these are the most common ways.

Rule of Thirds

Rule of Thirds is essentially a 3×3 grid overlaid onto a video. This helps you create a focus point or plot how elements in the scene should be placed. In video games, although we can’t see this 3×3 grid, we can notice the effect this will create in games where the camera is positioned over the shoulder of the character. Common in third person shooters or adventure games.

In this last of us example, the character is on the left hand side of the screen and the action comes in from the right hand side, later on in the game you have the ability to swap what shoulder the camera looks over, still sticking to the rule of thirds.

Symmetry

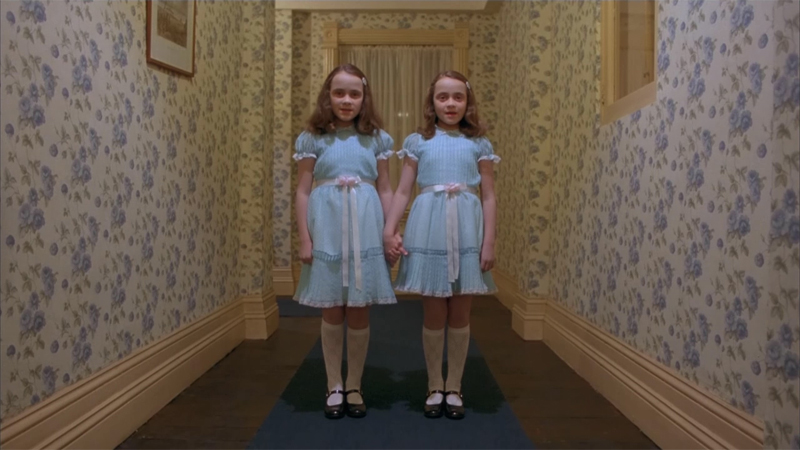
Symmetry is where a scene is symmetrical across the entire frame, it is designed to bring focus towards the middle of the scene or show something of importance. The Shining is a perfect example of this with the twin sisters.

What is Significant About “The Shining's” Use Of Mirrors and Symmetric  Imagery? | Read | The Take

Leading Lines

Leading lines act similarly to Symmetry, however there is generally lines from all angles leading towards the center of the scene.

Part 4: MATRIX Philosophy and Cinematography - ERIC KIM

Here in The Matrix, there is a narrow corridor that seemingly looks like it goes on forever, but because your attention is drawn to the middle, you can focus on Neo and Morpheus walking through the corridor.

VFX: History and Evolution – 20/11/20

If I told you that VFX has been around for a century, you’d say I was lying. Fact of the matter is VFX has been around for a century and it continues to grow and develop into something special each and every time we see them. VFX is designed to be magical and to help the viewer escape realism. At least thats how the Lumiere’s made it seem.

Way back in 1878, there was a device called a Cinematographe. This was a device that we pretty much have in our pockets today in the form of a mobile phone, but back then, it was fairly big and it was able to record, develop and project moving pictures. The device was originally designed by a man named Leon Guillaume and then was developed further by the Lumieres.

Operated by hand, this device used 35mm film that would pass through the device at a staggering 16 frames per second, this at the time created a fluid motion when viewed. It’s also worth noting that the device was portable so any location could have became a landmark in cinema history. The Lumieres for the time being though, were rooted to France.

The Lumieres debuted their first film at a Cafe in Paris, and it was an exciting video to say the least, it was a video of workers leaving the Lumiere factory and it lasted for a whopping 50 seconds. While the Lumieres didn’t really think much of it, it actually became a sensation to the people that they were able to watch something happen that they weren’t actually there for.

Le cinéma est une invention sans avenir—Cinema is an invention with­out a future.”

Louis Lumière

They would continue to make short films, one of these being released in 1896 and titled ‘The Arrival of a Train at La Ciotat Station‘ which as you can probably guess, was about a train… arriving at a station, how invigorating. What is fascinating and laughable about this is that when the train did pull in to the station, the viewers in the cinema ran away in terror.

A moving picture was a shock to the sens­es, revolutionary to behold.

Georges Méliès

And with that he approached the Lumieres and offered to buy a Cinematographe from them, they refused a generous offer of 10,000 francs. He decided to take his business elsewhere and went to London, where he would then buy an Animatograph film projecter for a tenth of the price. He would then re-engineer this into his very own camera.

He then went onto make a glass-enclosed studio where he would write scripts and design sets. He also discovered simple camera trickery that allowed stop motion, slow motion, dissolve, fade-out, superimposition, and double exposure. Effectively, without knowing it, he birthed VFX.

For years to come, he went on to make over 500 films and being heavily involved with them, from costume to script, Méliès was the man in the spotlight. Sadly, it all came to an end in 1917 during the first world war where his studio was turned into a hospital for wounded soldiers. The soldiers would confiscate his film prints and melt them down for silver and celluloid to make heels for their shoes.

In a rage of fury and with a crumbling future, Méliès then burned his negatives, sets and costumes and life as he knew it wasn’t the same. He opened a sweet and toy shop to make ends meet. Some of his best work includes films such as ‘A Trip To The Moon’ and ‘The One Man Band’. Both of which feature effects such as Double Exposure and Fade Out. This is evident in The One Man Band as he has managed to be in 7 different places at once.

The curious illusionist that was Georges Méliès set a standard and a legacy for film-makers to live up, for something that was dubbed to have no future by Louis Lumiere, Georges Méliès made something special and unique. He was able to capture people’s imagination and help them escape reality. More fool the Lumiere’s because Georges Méliès accomplished what they felt they couldn’t. Perhaps, they were afraid all along.

Camera Trick Research – 17/11/20

Today marks the start of learning about Camera Tricks. Camera Tricks are compositions of films that create an illusion as if it was all shot in one film. Below are some examples of camera tricks, I will attempt to break down how I think the artist has accomplished this.

Zach King does a lot of camera tricks in his videos and he also details how he’s done them in some of his videos. The first example there is him riding a broom stick in a harry potter-esque way. This was achieved by him jumping up so he has a shot of his legs bent, he might have numerous shots of this from different angles, and then he could also have a shot of him riding a skateboard with the broom between his legs. Then you mask the jumping shots on top of the broomstick shots.

He appears to use a lot of perspective tricks as well, making objects appear in places or in positions that they aren’t. Take this Eiffel Tower video for example, he appears to steal it from Paris.

This was achieved by filming three separate shots, one where he is, one just of the Eiffel tower, one of him positioned in front of the Eiffel Tower and one where he is holding an Eiffel tower souvenir. He then uses software like Adobe After Effects to compose his shots and mask out anything that shouldn’t be there.

Very clever and an interesting observation to say the least, it almost makes it impossible to think of something unique because he appears to have done it all, from Augmented Reality to simple perspective tricks.

Double Exposure – 10/11/20

In todays session we learned a little bit about double exposure and composition in after effects. For my double exposure example, I took Crash Bandicoot and merged him with a forest // jungle setting.

This was my source image..

This was my background image..

The following result was achieved by using the pen tool and drawing around Crash.

Then adding my background layer, I set the track matte to luma matte which then created the final result.