In the 3D modelling industry, when we create 3D models, they are created in a 3D space. This space has 3 Axis, X which is horizontal, Y which is the height and Z which is the depth. UV simply refers to the 2D space on these 3D models. In this 2D space, we will apply textures and details to the 3D models.
A UV Seam is the cut that is made on the UV space. When we want to texture the 3D model, the UV space must be unwrapped, to do that we will need to make cuts on the faces of the model that we want to UV Unwrap. This makes it easier to plot the UV Map when it comes to texturing.
A UV Island // Shell is the UV after it has been unwrapped. It is what the UV image looks like once UV Unwrapping is complete.
We use a black and white checkerboard when checking the UV map to check the integrity and texel density of the UV unwrap. If the checkboard features squares that are uneven or rigid, then the UV map is to a poor standard. You could still map on this, but the results won’t be the best. If the squares on the checkerboard are all perfectly shaped, then the integrity and texel density is perfect for the 3D model that has been unwrapped.
In todays session, i started to model the low poly version of my loot crate. I have changed my idea from my baking plan as it was too complex, with this idea it is straight forward and totally doable. I will update previous posts to reflect this idea change.
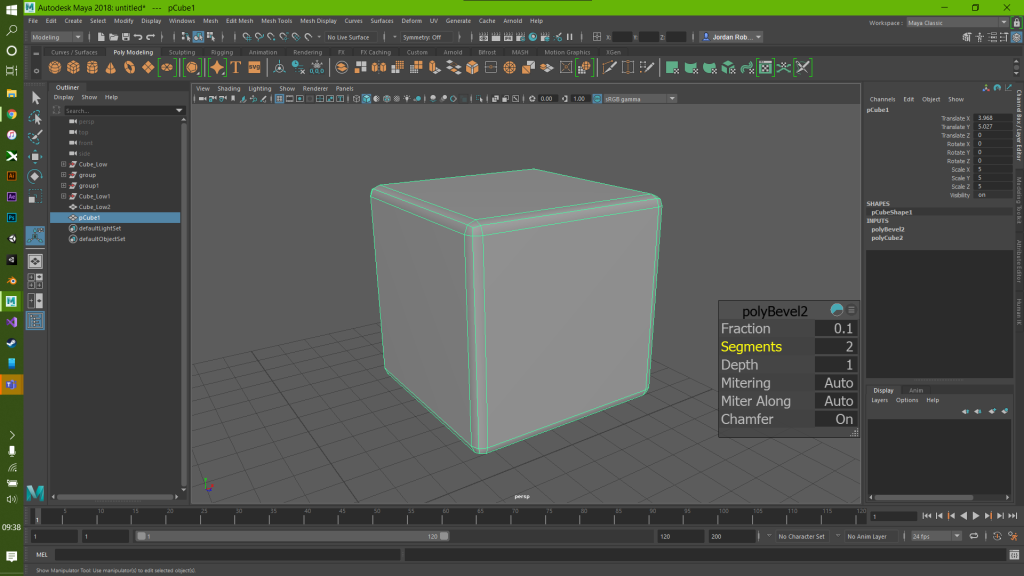
So to start, I made a cube and scaled it to 5 on each axis, this is so I have a nice big area to work with. I then bevelled the cube to give it some nice soft round edges.
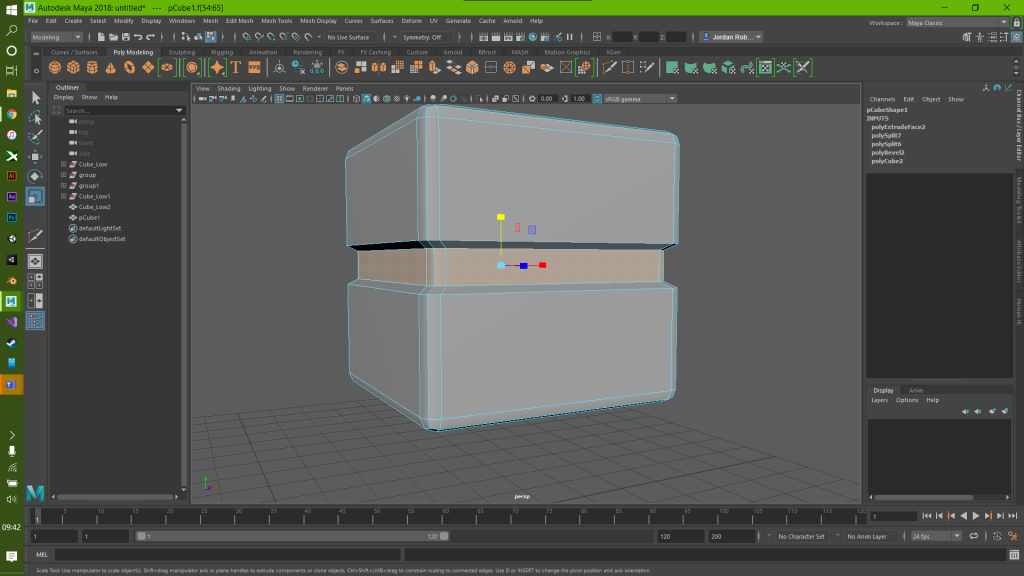
To give this some shape, I took the multi-cut tool and created two edge loops to create a belt around the cube. I then scaled this inward.
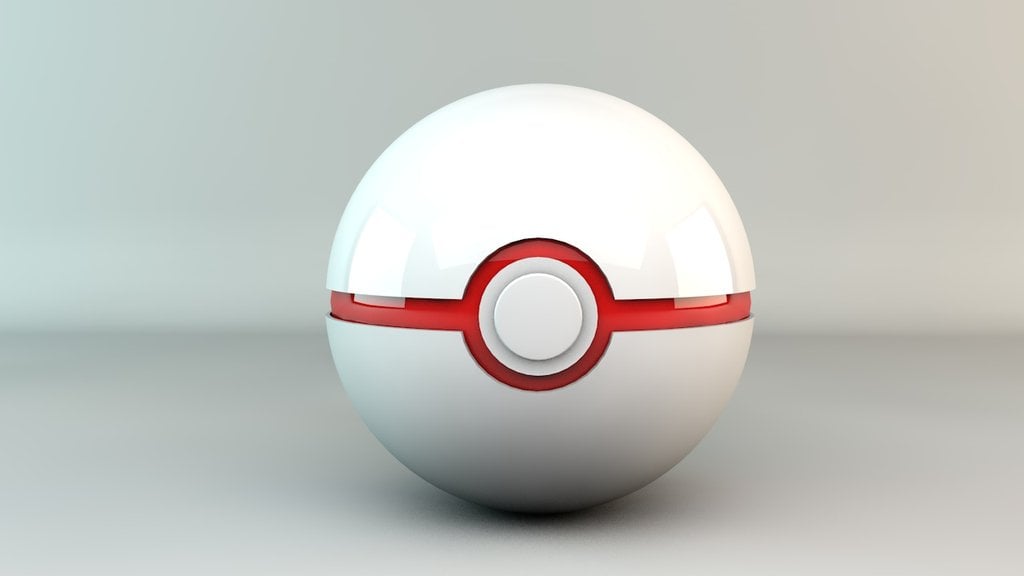
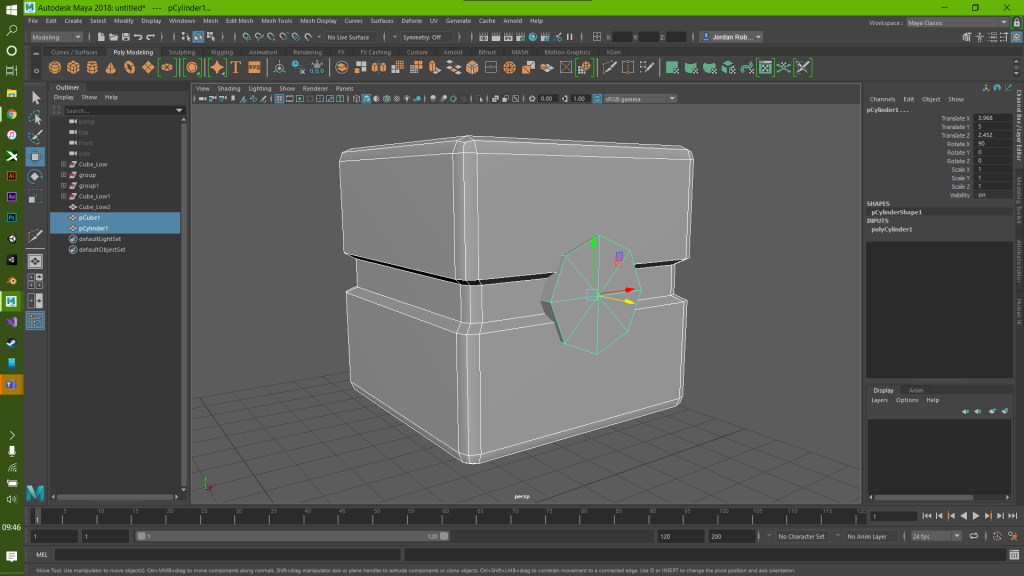
Now we have a basic Pokeball style cube, it was time to design the button before moving on to some high poly stuff. I went around this in an unorthodox method. Firstly I created a cylinder. I then rotated it 90 degrees in the X axis and then changed the properties of the cylinder. I gave it 8 subdivisions instead of 20 and set the height to 0.3. I then positioned it to act as a button like a pokeball.
I then got the multi-cut tool again and cut vertical and horizontal loops around the cube to match the levels of the cylinder. Finally I made a loop on the cylinder front to extrude inwards to look like a button.
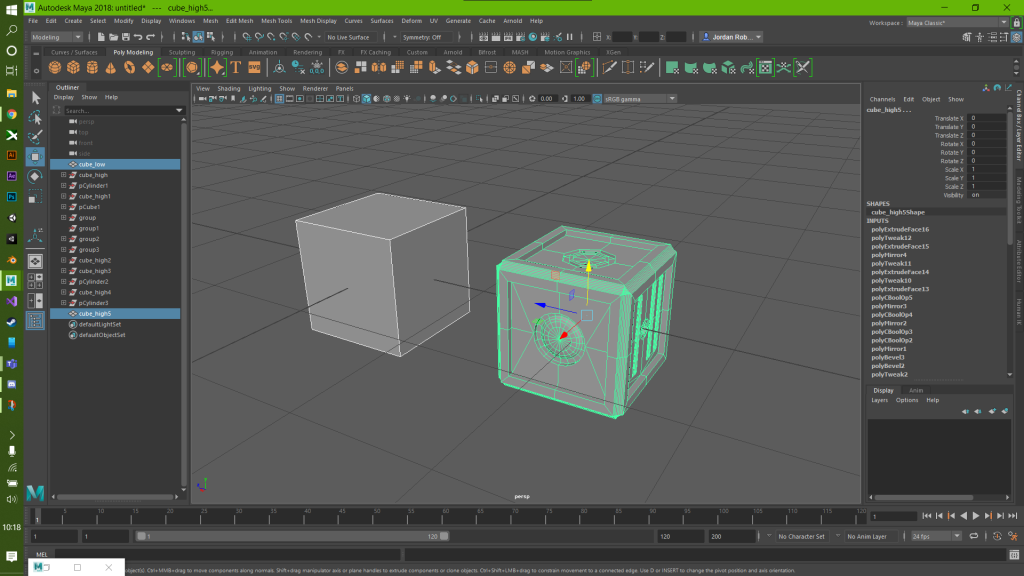
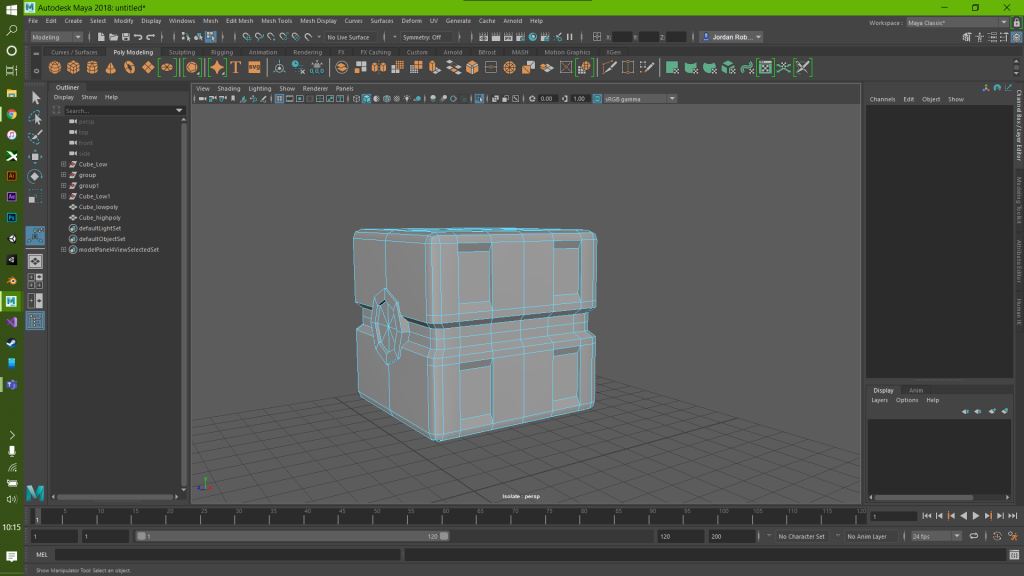
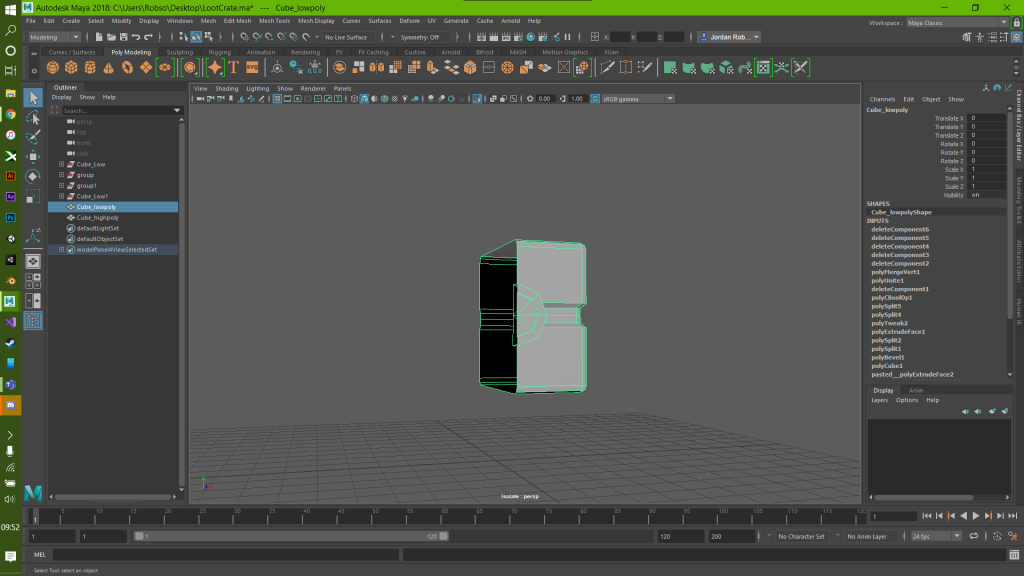
This is my low poly model, now I need to add some finer details for a high poly model and then move on to UV unwrapping. Firstly I duplicated my cube and renamed it to cube_highpoly. For the finer details I’m looking at adding indents on the side. Using the multi cut tool, I added more edge loops and then indented parts on the side.
I mirrored this to the other side and then started to work on the gaps between each indent. I added some more indents and then worked on the face of the cube. I selected the four corner faces on the front of the cube and beveled them, this created a nice effect which I am happy about. This is my finished high poly model.
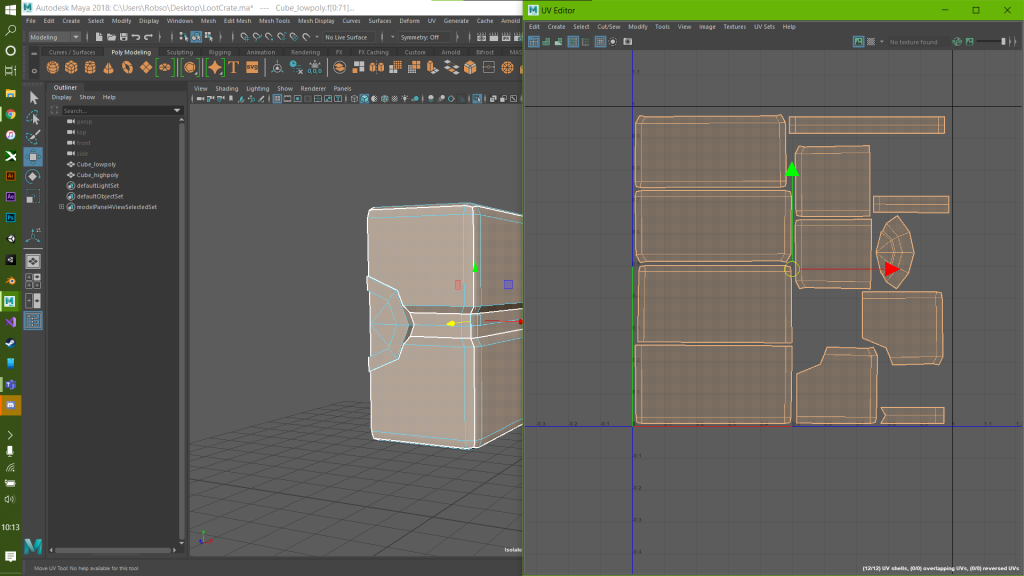
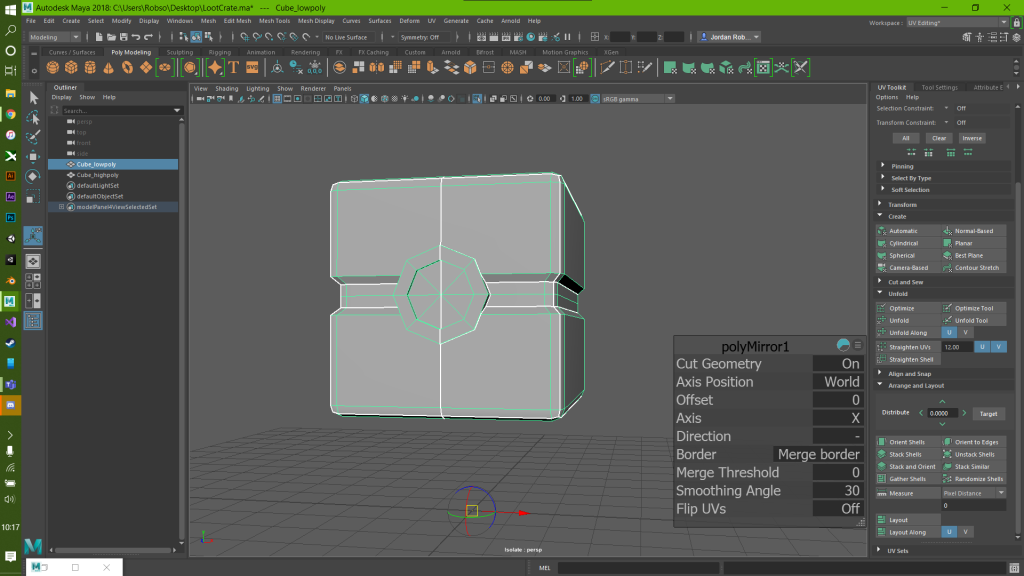
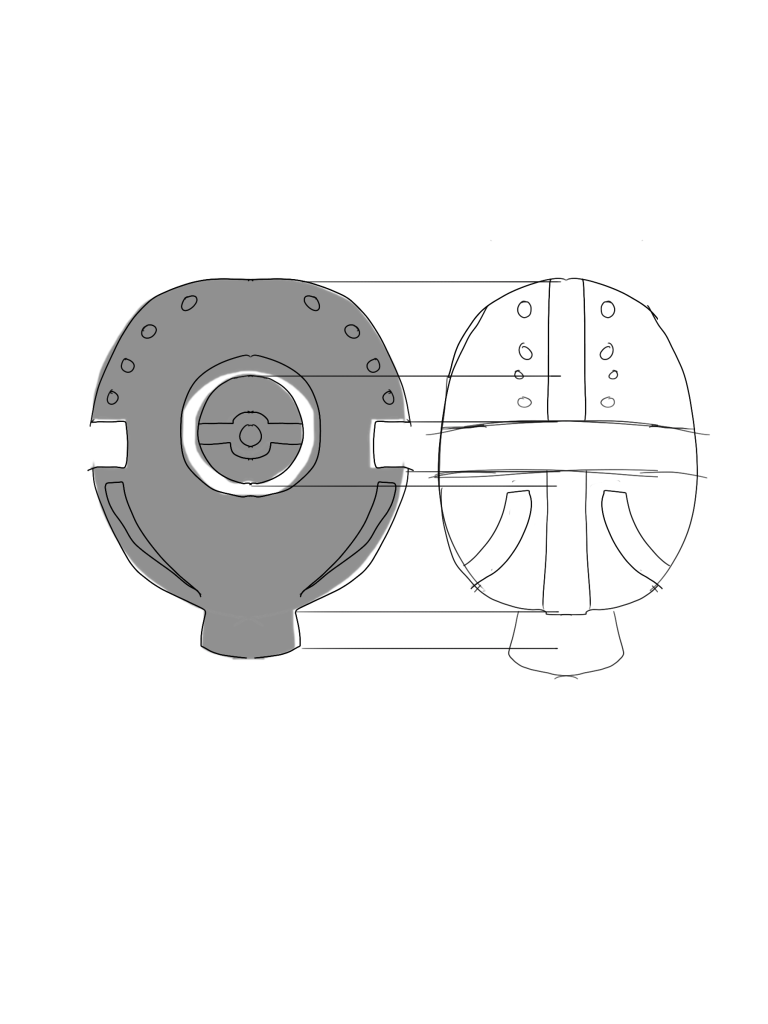
With the high poly model done and low poly model, all that was left to do was to UV unwrap the model. As my model is symmetrical all the way around, this will allow me to improve my work flow. Rather than UV unwrapping the whole thing, I can simply just UV unwrap half of the object and then mirror it back to how it was.
To begin this process, I deleted half of the model and kept other half.
I then deleted the history of my model before doing any UV unwrapping.
After this, I then started to select the faces to start UV mapping, I started with the front top part of the model and then moved onto the belt of the model. About 20 minutes later, my whole UV map was complete.
The reason I have done it like this is because the top and bottom parts are going to be different colour, in hindsight I could have done it as a quarter and possibly shortened the time by mirroring and then repositioning the UV map but I wanted to be careful and cautious. Next I mirrored my object back to the original state it was in.
Now it is ready to be textured and for the high poly to be baked onto it. This is going to be the basic poke ball loot crate. I will look into adding some more details such as a Ultraball and Masterball design aswell.
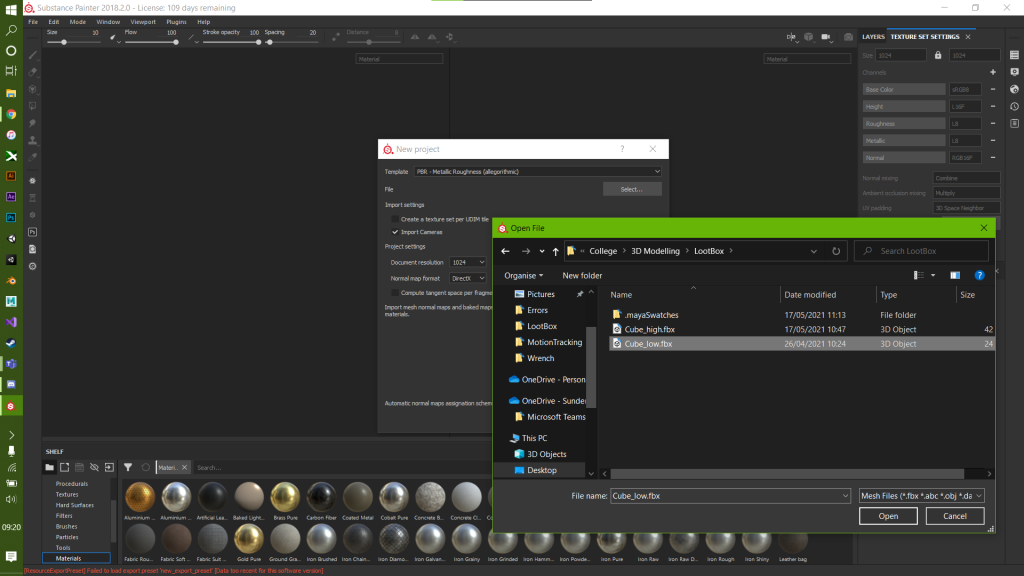
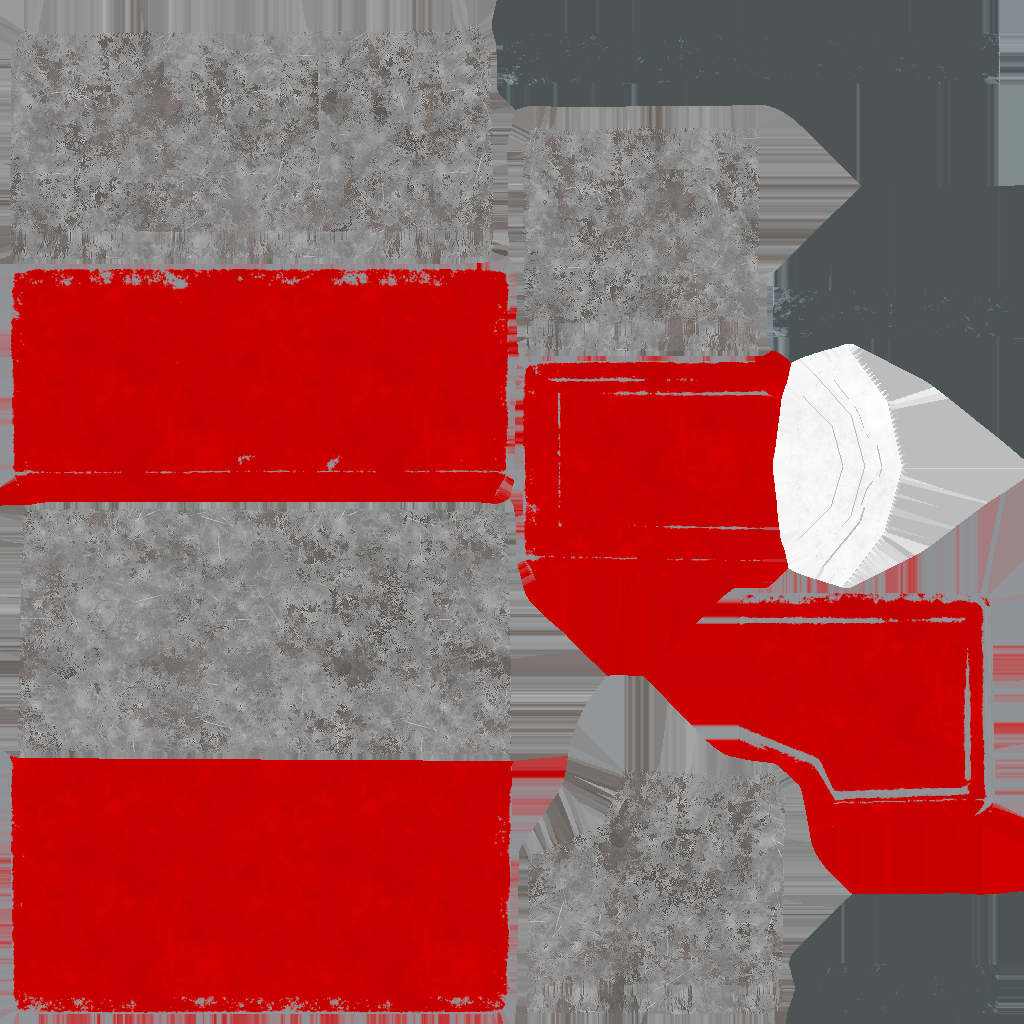
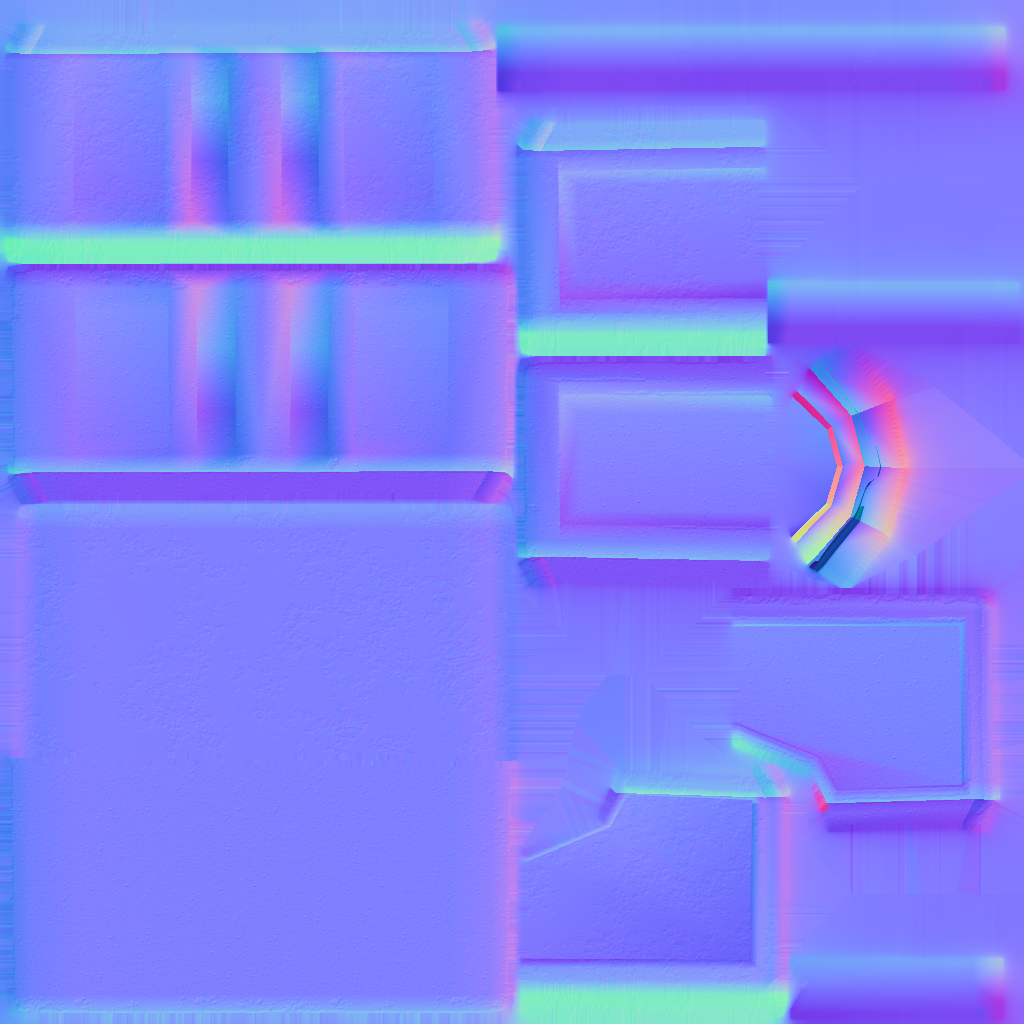
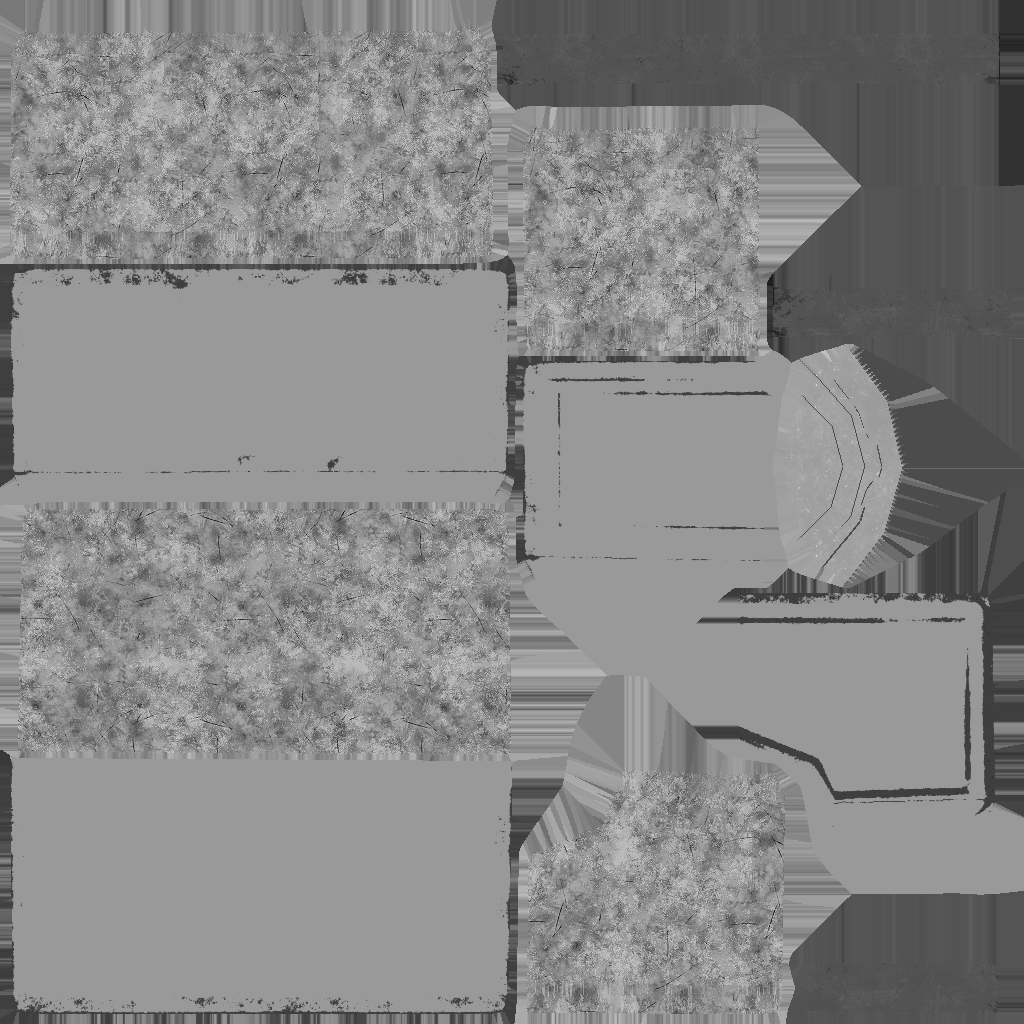
I opened up Substance Painter and loaded my low poly model into Substance, making sure my template was set to PBR – METALLIC ROUGHNESS. Once this was done, I immediately went to bake my high poly model on to the top of it.
Once it was done baking, I inspected the model to see if the settings from the bake looked good. After a bit of trial and error, I came to a result I was happy with, so then I started to texture the loot crate.
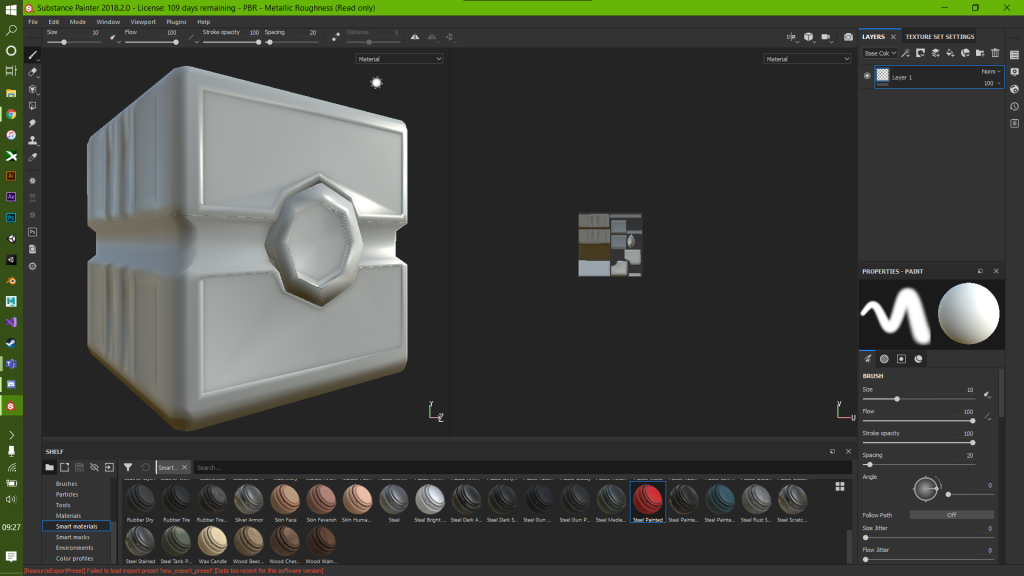
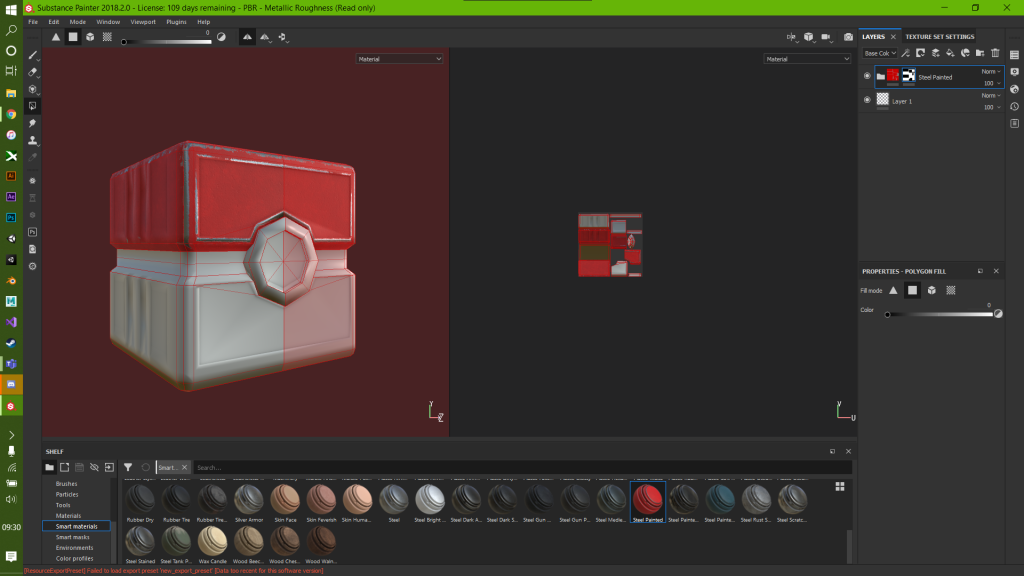
Firstly, I started with the top of the model and used Substance Painter’s built in smart materials. I used the Steel Painted texture first for the top half of the model. I dragged the material from the bottom panel to my layers panel and then applied a mask to the material. The easiest way for me to do this was to use Polygon Fill. This allows me to mask out the texture dependant on my mesh.
I then worked on the bottom half of my model, I wanted this to be a metallic texture as in the anime, the colour of the Pokeball was an icey white, telling me the bottom of the ball was some kind of metal. Substance Painter has numerous metal materials so I found one that I liked and applied it the same I did with the top half. I then created a mask and got rid of the parts where the material shouldn’t apply.
Finally, I worked on the black band around the box. In the anime, this black band always seemed like a shiny plastic however, in Substance after a bit of experimenting, I felt that a darker metal material looked better than a shiny plastic. The process pretty much is a rinse and repeat. So I added the finishing touches to the button on the front of the box to open it.
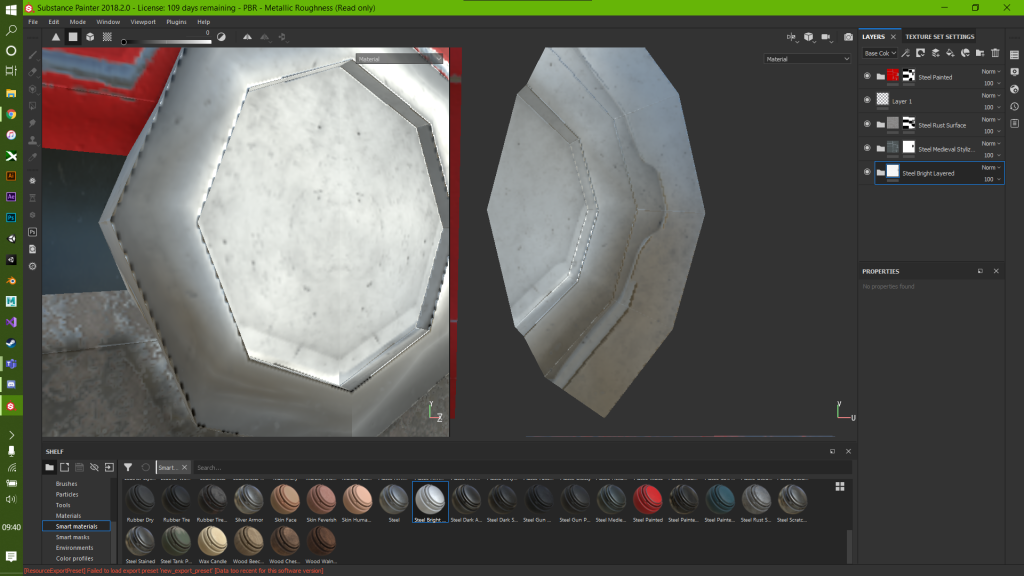
Now this looks great from this angle and as a render it will look even better but one of the problems using masks and poly fill is that if you get right up close to the model, you can see where the seams of the mesh meet and you get this rigid, pixelated effect.
This is purely down to how the mesh or the UV map has been created. It is important to note that this is only visible when you are really up close to the model itself.
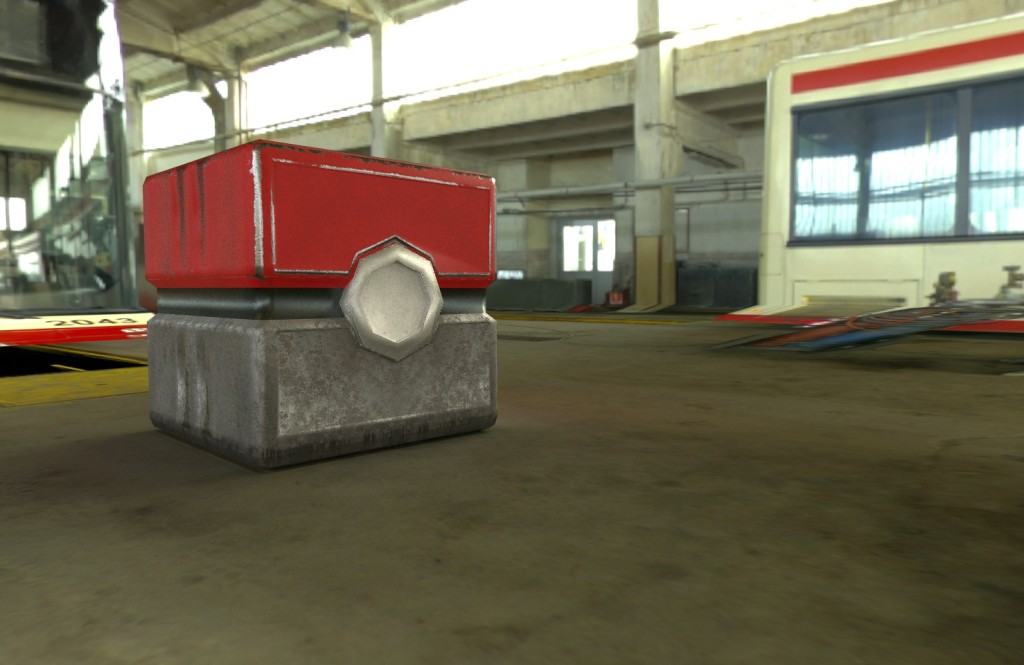
I then turned to rendering by hitting F10 on my keyboard. From here I changed a few of the render settings such as how many iterations to render and the environment map. I also turned Caustic Sampler on, this made the lighting seem a bit more real. For the environment map, I chose Substance Painters built in bus garage environment, I felt this complimented the loot box really well.
Textures exported from Substance Painter.
Overall, I am happy with the way my lootbox turned out, I know the shape is quite generic and I haven’t completed the other designs I wanted to complete but in terms of the bake and the texturing, I am really please with the way this came out. I came up with loads of other designs so if I was to do this project again, I’d definitely go for something more complex, as originally planned.
This loot crate is a unique one and for that it is going to be challenging to model but I have a plan as to how to do it. In terms of baking details high to low, I plan on started with the Pokeballs themselves. I will have an original Pokeball model and then bake the ridges and grooves of the of the balls on to that.
The ridges coming out of the great ball for instance will be on a high poly version. Although the Ultra Ball doesn’t feature any grooves or indents itself, I am slightly inclined to bake the central ‘n’ shape as a slight indent and finally the master ball. The Masterball features 2 bulges at the top of each side, these will also be baked from high to low.
All the balls feature a black horizontal band that is normally indented slightly, I will also be baking that in to the balls themselves as well as an inner ridge on the button.
As for the casing, I will design the basic shape firstly and I aim to have jewels at the top of the casing and at the bottom where there is an arced shape, my original idea was for this to be glowing to match the colour scheme of the ball. That same colour schemed glow will be going down the middle of the model when viewed from the side aswell.
Finally for a final piece of detail, I will probably need to UV on the word Pokemon with the Unown letters going across the side.
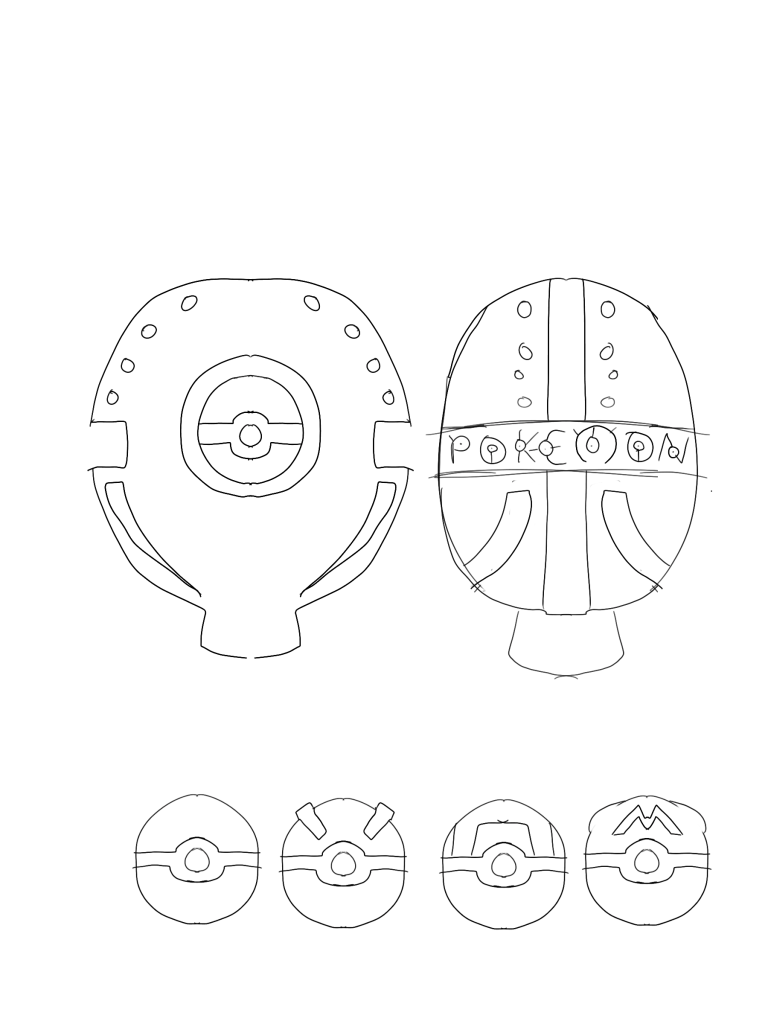
In todays 3D modelling session, we started drawing references to base our 3D model from. Drawing References are nothing new but they essentially help us shape our 3D models from reference planes, there is also a technique called turnaround drawings which is essentially a static 3D rotation of the drawing, so you can get a true sense of depth.
For simplicity, I simply drew my loot crate from the front and from the side. To begin, I chose my silhouette drawing I liked most from last session and imported it to ProCreate on my iPad. I then reduced the opacity of this layer.
I then traced around it to make a line drawing and started adding some finer details, this is so we can get a rough idea of what elements are going to be baked on using the high to low baking process.
A neat technique here is that we drew lines from each point of the drawing, this allowed us to accurately place or draw the side view based on the front.
Finally I drew the side view, on the side I have added a subtle detail reference to the Pokemon, Unown. The Unown are a mysterious Pokemon that come in multiple shapes based upon the alphabet. I’ve also drawn the different types of balls to represent each type of loot!
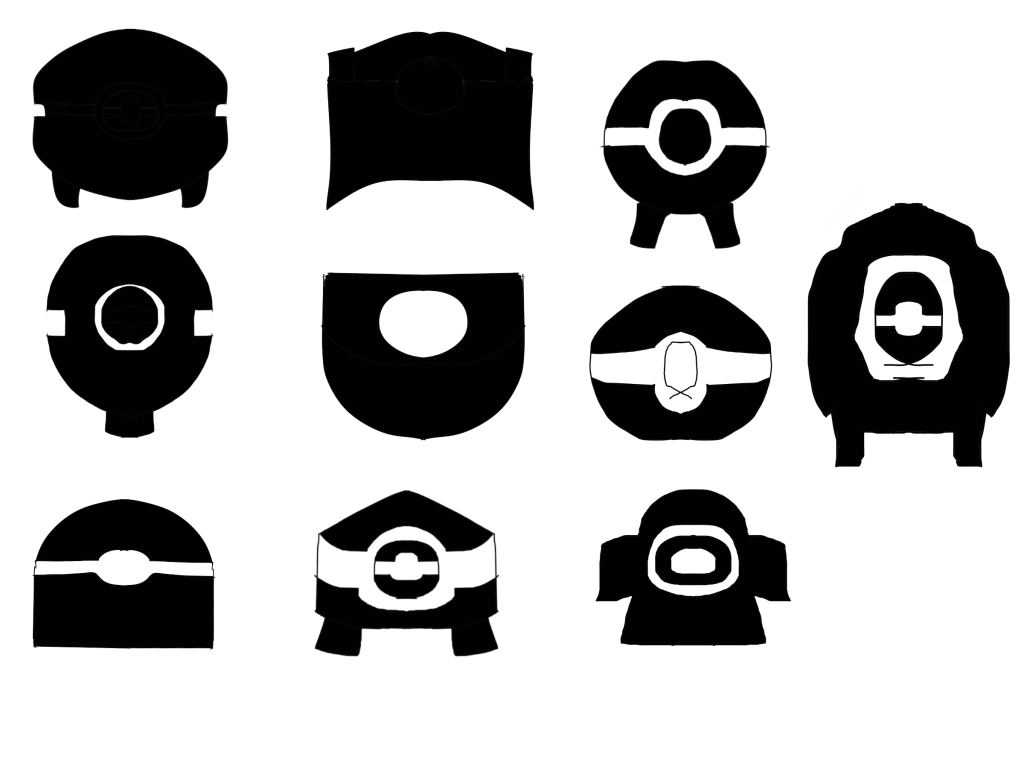
In todays session, we started drawing silhouette’s for potential designs of our loot chests, as mine is Pokemon themed, I have a fair amount of knowledge on Pokemon so tried to go for a more spherical // circular approach. A silhouette design is useful for recognition of things, such as in video games, you will be able to tell if something is friendly or an enemy based on their silhouette, but the same principle applies for objects aswell.
I like most of my designs here, although they aren’t coloured and show no detail, I think that if these were in a video game, it would be instantly recognisable. I think my favourite of the lot is the 2nd one down on the left hand side, it has so much potential for the ideas that I have. A lot of my designs tend to have a top and bottom half, this is where the colours of item rarity would come in to play. If it was an epic rare item, the top half would resemble that of an ultra ball.
As my idea is pretty solid, I didn’t face any challenges drawing these silhouettes, Once I had the idea of Pokemon and the 25th Anniversary, some of the ideas came to me pretty quick and it’s pretty clear what I want to go for in these designs.
For this project, we are going to be creating a loot crate asset that is commonly seen inside video games. These loot crates can hold common, rare, legendary // epic and exotic items so the chest’s appearance could change dependant on the content, although it probably makes more sense to keep the player guessing and have a light coming from the box that changes dependant on the loot.
Idea 1 – Ye Ole Pirates Treasure
What genre of game could this be from? Ocean exploration game.
What type of game is it? Adventure.
What item is in the chest? Gold, Pirate Flag, Bandana, Eye Patch.
What Level of Rarity is the item? Rare.
How could this affect the design of the chest? When people think of chests that could be potentially underwater, the most common theme for this would be something like a pirates chest. A nice iron frame with planks of wood in between it. A key hole lock on the front of it. It would be interesting to see if I could maybe put a glow coming from the lid of the box.
The design of this one would be similar to the chest seen in Fortnite.
Idea 2 – The Sci-Fi Crate
I’ve been playing a lot of Destiny 2 recently, probably the best looter shooter out at this very time and this project got me thinking of the loot crates used in Destiny 2 and how they could be taken to the next level.
What genre of game could this be from? Sci-Fi
What type of game is it? Adventure.
What item is in the chest? Weapon, Armor, Currency
What Level of Rarity is the item? Legendary
How could this affect the design of the chest? Having seen the loot crates in Destiny 2, they are very plain but a big aspect of why people play the game alot, to see what they are going to get next, to see if the grind paid off. Nothing quite like the feeling of beating a 4 hour raid and opening the chest to some legendary gear. With a game like Destiny, the appearance of the crate doesn’t change too much but they can have different effects on them, so crates on the moon have moon rocks attached to them and the crates on Earth have a bit of dirt on them here or there.
What is also important to note is that the chests are identifiable and visible from some distance thanks to a green light on the front. It is also important to note that the chests in a raid or a dungeon appear different to chests spotted in non-linear levels. I’m going to design a chest that represents a raid // dungeon chest, these normally have extraordinary shapes on them with high details on the lock piece.
Idea 3 – The eSports Loot Chest
With this idea, I have two different ideas in mind. I have the idea of FIFA Ultimate Team in mind where you have a packet of trading cards that you can open to reveal some cards. The other idea was more towards the crates that are used in Overwatch. In Overwatch, the crates a small and when opened, reveal a holograph of the reward.
What genre of game could this be from? Sci-Fi, Sports, Adventure
What type of game is it? Sports, eSports, Adventure
What item is in the chest? Cosmetic Items, Playable Characters
What Level of Rarity is the item? Epic
How could this affect the design of the chest? I think the stronger idea would be a loot crate like the ones seen in Overwatch, as much as the idea of a trading card packet from FUT does interest me, there isn’t much room for creativity there. This chest would be based as a cube with high details, vents coming off the side, a nice holographic lock, a not too plastic looking texture.
Idea 4 – Gotta Find Them All!
Another chest idea, away from the eSports side could be a Pokeball type chest. What if this was a game where instead of catching all the pokemon, you had to obtain them from chests in an open world? This leads for an interesting concept.
What genre of game could this be from? Adventure
What type of game is it? Adventure
What item is in the chest? Playable Characters
What Level of Rarity is the item? Common, Great, Ultra and Master
How could this affect the design of the chest? The design of these chests is entirely dependant on the loot, if the pokemon inside the chest is common, it would have the colours of a pokeball, if the pokemon is a ‘great’ pokemon, the colours would reflect those of a great ball. The Ultra pokemon would be those of an Ultra Ball and the same for the Master pokemon. The chest would be square with an indented black ribbon in the middle, the lock of the chest would be a Pokeball, but of no colour.
Of all these idea, I think I prefer the Pokémon idea, having been such a long standing fan and with the company celebrating their 25th Anniversary, I couldn’t think of a better way as a fan to celebrate this achievement other than to design a loot crate based on Pokémon. Could even have something like a premier ball for crates containing purchased items.
.Although, my crates won’t be the typical sphere, It will infact be a cube but just the colours of the balls in the game to represent the types of loot that could be inside these crates.
The items in my moodboard represent the shapes I could go for in my loot chest, aside from the balls. I was thinking something more like the Overwatch chest as opposed to the clunky chest in the middle. The Overwatch chest would allow me to bake more details in a normal space. I’ve added images of the balls as a reference to colour and rarity. Whilst my chest won’t be the exact same shape as the lootbox from Overwatch, it will be similar. Unlike the chest from Overwatch, my chest will have a definitive front that will represent the design of a Pokeball.
The lock on my chest won’t be a button like what is on a pokeball but a pokeball symbol iteself. I will also need to look at baking indents for the colour marks on the Pokeballs. It is going to be a challenge to make these as interesting as possible whilst trying to stay true to the franchise.
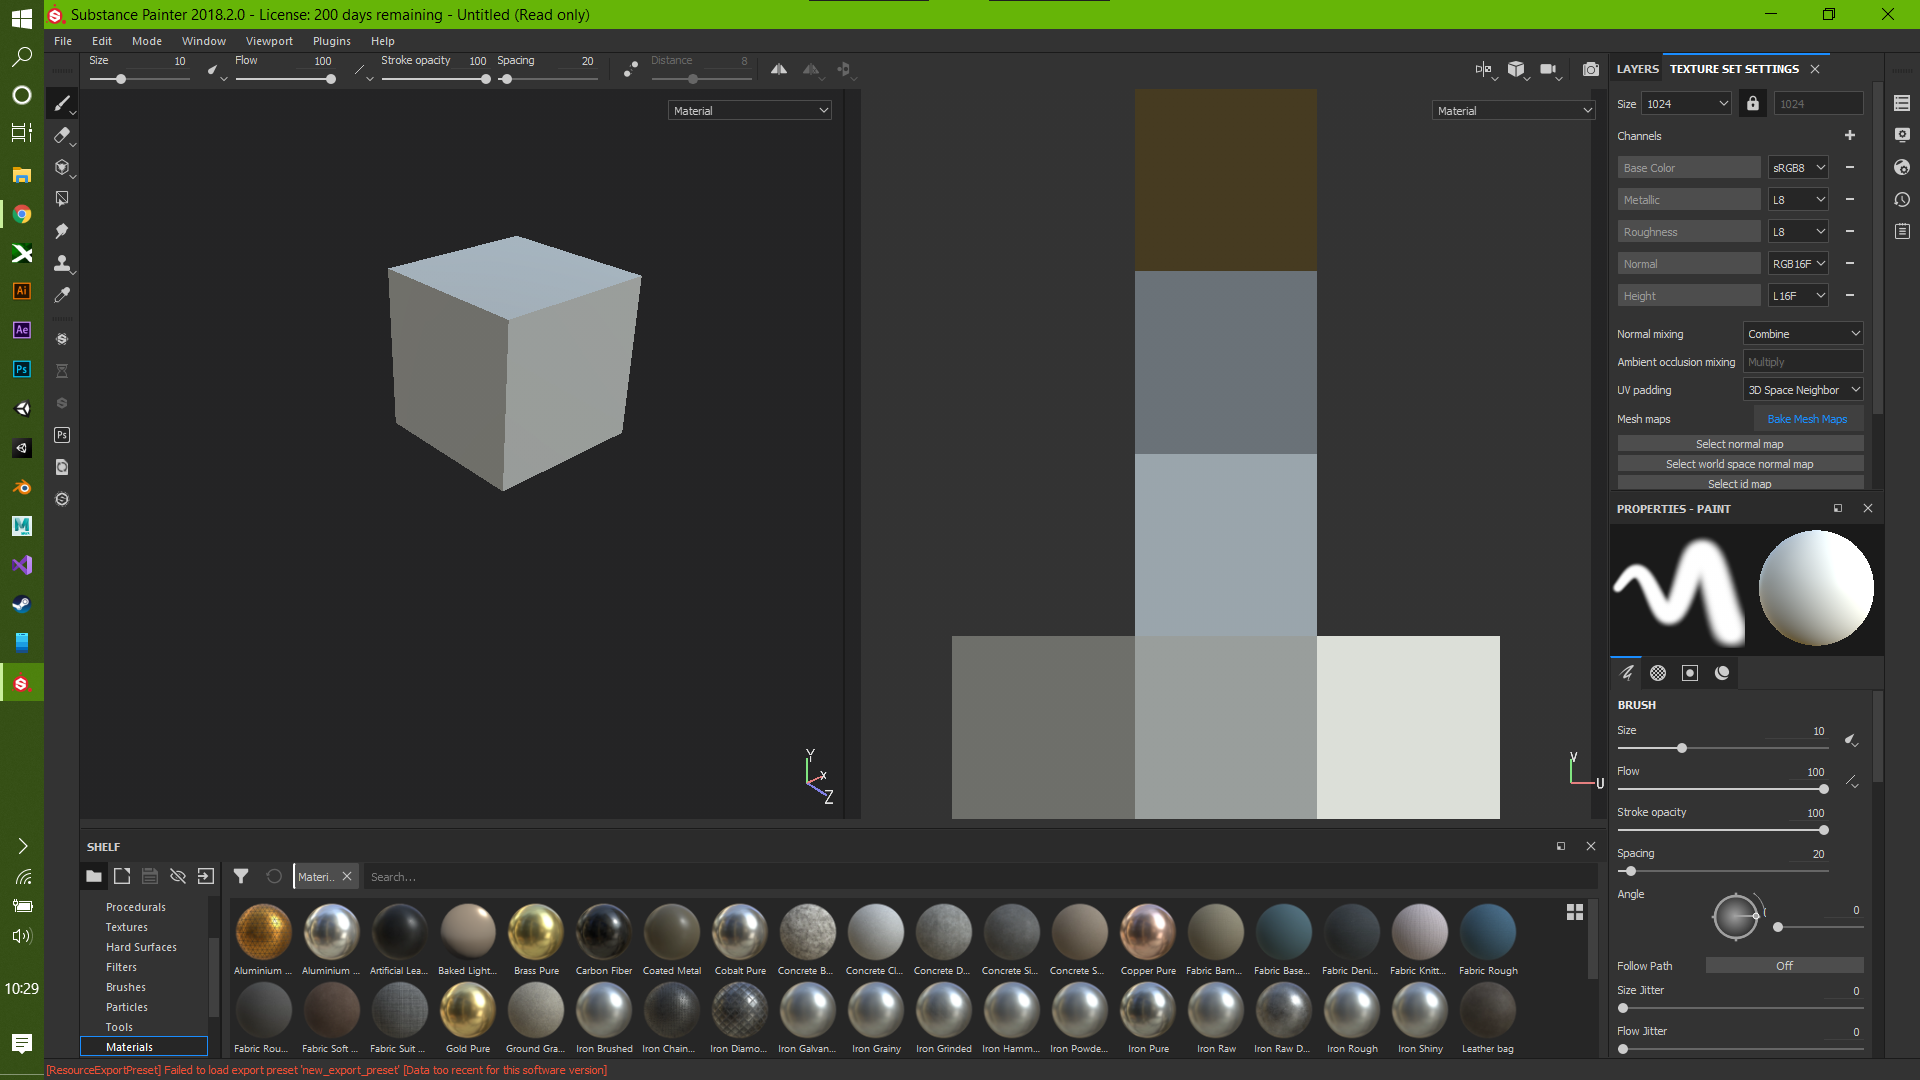
In todays session, we were learning about baking our high poly cube meshes onto our low poly cubes. We done this through Substance Painter. Firstly, we created a new project and imported the low poly cube, then on the pane on the right hand side, we clicked on Bake Mesh Maps.
Then in the next menu, I turned up the sample size from 512 to 1024, turned up the dilation a little bit, imported my high poly cube, changed the max frontal and max rear and then set anti aliasing to 8×8 for a crisper texture. Most importantly, I set the match to By Mesh Name.
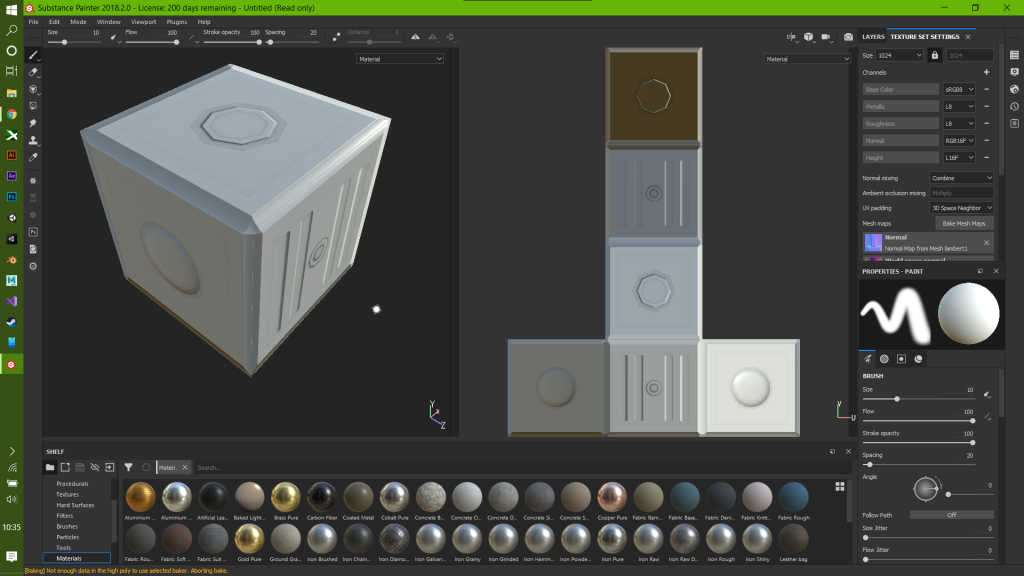
I then clicked Bake Mesh and awaited for the oven to ping as it was baking my high poly mesh to my low poly mesh. Roughly, 7 minutes later and this was the result.
Personally I feel like this is a good go, from certain angles it definitely does capture the original high poly mesh but then from other angles, you can tell it’s a low poly version of it. I think if I didn’t have massively bevelled edges or deep indents, this cube wouldn’t look half bad. I also feel the ridges for the centre-piece could have maybe also been bigger to prevent distortion. Other than that, I am happy about the result. I suppose using Substance Painter to texture it might make it look better.
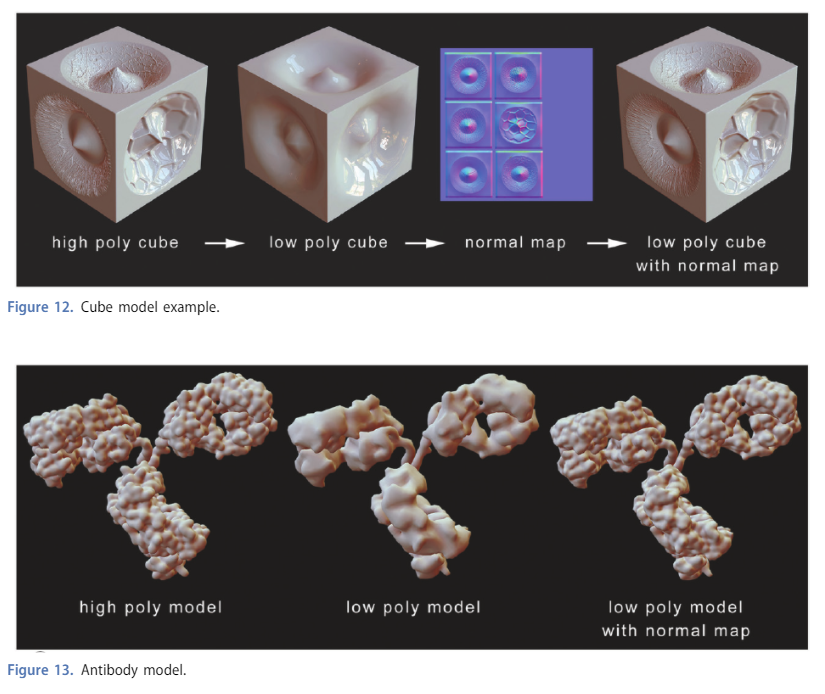
The high to low polygon workflow is a process of optimisation. It starts with having a high-poly 3D model that we would bake a normal map from. From then, we would start to use subdivisions and smoothing to get a low poly version of the model. We would then apply that normal map to a low poly version of he 3D model to make it look high quality, but it becomes less resource intensive. When we bake a texture, we are essentially transferring the details from one 3D model (High Poly) to another (Low Poly).
It is important to note that this doesn’t change any of the models geometry, it only changes the way the light hits the model.
For todays task, we were challenged with tapping into our creativity with Maya and modelling a cube into anything we wanted it to be. I took a base cube a duplicated it and named one cube_low and cube_high. I kept the cube low normal and started getting to work on cube high. This is my result so far.
The cube features loads of details and I have a vision as to how I would want to texture this cube, if this was a game asset, I’d probably use it as a futuristic breakable crate containing health or ammo. Modelling the high poly cube wasn’t particularly difficult, using Booleans is an interesting concept as it allows you to join and cut shapes out of objects, however it could also cause a mess such as N-Gons and what not, but it allows you to also capture the finer details.
In todays session we were learning to use Substance Painter whilst participating in the Meet Mat challenge. This is where we paint the mascot of Substance Painter to a design that we choose. I took some inspiration from my Playstation for this challenge and used that as a colour scheme.
Substance Painter is a tool that requires alot of time and patience, I feel like it would be awesome for smaller details on Low Poly models but models with a lot of poly’s will require a lot more time. With this particular model, that challenging part for me was trying to get into the grooves on the face of the model.
As I am an experienced Photoshop user, the interface and tools available to me are top drawer, being able to mask and paint with multiple textures, and being able to change the colour of the materials is an added bonus. I also like that you can export the UV to Photoshop for some advanced texturing if you need to, I might try this to add a Playstation logo to my Meet Mat model.
As I’ve rendered my model, I have turned down the iterations of Rendering due to my laptop graphics card, This is the result of 88 iterations and it doesn’t look too bad.
At my second attempt, I have made a Zero Themed MeetMat. This is the result of using smart materials and smart masks. It adds more detail and life to the model by using these utilities, and makes the whole texturing process alot easier.
Smart Material applies the material to the model in a way that is best for the models shape and dynamic. A smart mask applies a mask to the layer and allows you to paint over the top for a desirable effect. I have used this in my Zero MeetMat for the rust effect.
Substance Painter is a software that allows you paint textures onto 3D models in real-time so you are able to see what the texture looks like on the 3D model. In some sense, this allows you to precisely paint where certain materials should be on a 3D model.
As an example, if we take Rick Grimes hat from The Walking Dead, we could 3D model this and in Substance Painter, we would paint the hat with a cloth like texture, the bullets and sheriff badge with a metallic gold texture and the rope with a gold coloured rope texture. The rope is where Substance would be really handy because there is finer details in the texture itself.
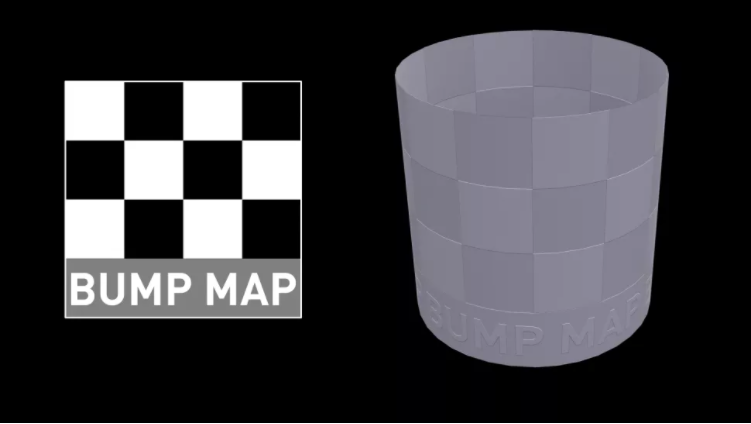
The way Substance Painter does this is it uses textures that use maps. Maps are a component of a texture that make it seem like its got certain elements. That path in The Elder Scrolls isn’t as bumpy as it may look. Maps come in many different forms. There are things called Emissive Maps, Normal Maps, Roughness Maps, Displacement Maps, Metalness Maps and many more. These are often referred to in a process called Physical Based Rendering.
Physical Based Rendering is a rendering method for textures that attempts to simulate how light sources react to models, trying to make it as life like as possible. The way it does this is by using multiple texture maps to help create the simulated material.
Emissive Maps are textures that are shown at full intensity, they receive no light so are always visible.
Normal Maps are images that stores direction within each pixel. It uses the images RGB channels to control the direction of each pixels normal. A method like this is commonly used to fake high-detailed textures on a low poly model.
Roughness Maps are images that allow you to control how sharp reflections are from the material. I think Marvels Spiderman on PS4 does a great job with these with the reflections in the Manhattan windows.
Metalness Maps are images that assist the renderer in telling it what part should be metal-like material and what shouldn’t.
With 3D materials, there is also the Fresnel (pronounced “fre-nel,” the “s” is silent) effect. This is basically how much reflection you see from a material dependent on the viewing angle, Because such things exist in computer graphics, this means that we can actually alter real-world materials to make something as dull as concrete, look reflective, although it wouldn’t quite make sense. In the example below, we can see the centre of the material isn’t at all reflected but as it eases closer the edge, it becomes more reflected.
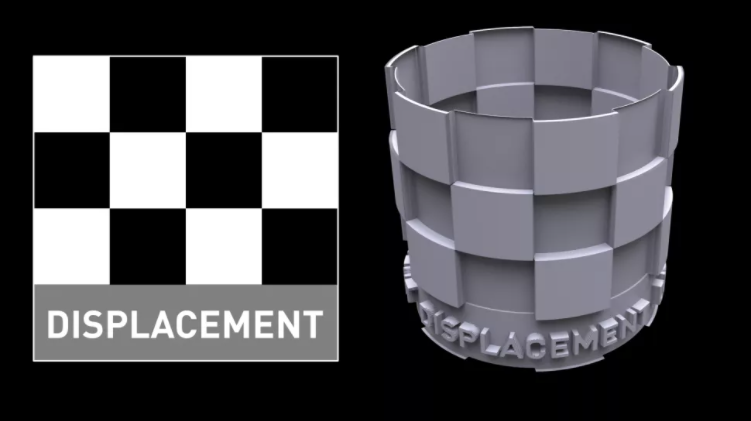
Another map I want to talk about is the Displacement Maps. Displacement Maps allow textures to cause an effect where the geometric points of the textures are displaced, allowing it to seem bumpy and have some depth, these are different to normal maps and bump maps as they are more intensive to render.


/cdn.vox-cdn.com/uploads/chorus_image/image/49704539/lootbox.0.0.png)